How Do I Safely Install Hardscape Lighting Outdoors?
Installing hardscape lighting outdoors can significantly enhance your landscape's appeal, but safety is key. You need to consider various factors, from planning your layout to gathering the right tools. Plus, knowing how to handle the wiring is crucial. Are you ready to learn the essential steps that will ensure a successful and safe installation? Let's explore what you'll need to get started.
Key Takeaways
- Gather essential tools like a shovel, wire strippers, and screwdrivers, along with safety gear such as goggles and gloves.
- Plan your lighting layout carefully, marking locations for fixtures and ensuring compliance with local regulations.
- Dig trenches at least 6 inches deep for wiring to protect it from damage and follow manufacturer instructions for connections.
- Secure all fixtures and components to prevent movement and maintain proper spacing between lights for optimal illumination.
- Regularly test the lighting system and perform maintenance to ensure ongoing functionality and safety.
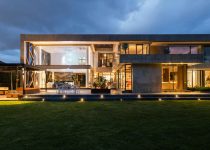
Understanding Hardscape Lighting Options
When it comes to enhancing your outdoor space, understanding hardscape lighting options is essential. You can choose from various styles, each serving a unique purpose.
Path lights illuminate walkways, ensuring safe navigation. Wall-mounted fixtures highlight architectural features and create ambiance. Step lights make stairs safer while adding a decorative touch.
If you're looking to showcase specific elements, consider spotlights or floodlights to draw attention to trees or sculptures. Don't forget about deck lights; they provide a warm glow and enhance outdoor gatherings.
Solar-powered options are eco-friendly and easy to install, while low-voltage systems offer versatility and energy efficiency.
Planning Your Lighting Layout
As you start planning your lighting layout, it's crucial to consider both functionality and aesthetics. Think about the areas you want to illuminate—pathways, steps, or seating areas—ensuring safety and visibility.
Next, visualize how your lights will enhance your outdoor space's beauty. Use a mix of ambient, task, and accent lighting to create depth and interest.
Sketch a rough layout, marking where each light will go. Keep in mind the height and angle of the fixtures to avoid glare while maximizing coverage.
Also, consider the existing landscape features; you might want to highlight trees, sculptures, or architectural elements.
Finally, remember to account for electrical access and any local regulations regarding outdoor lighting installations.
Gathering Necessary Tools and Materials
Before you start your hardscape lighting project, gather the essential tools and materials you'll need.
You'll want to ensure you have everything on hand to make the installation process smooth and efficient.
Let's take a closer look at what you'll need to get started.
Essential Tools Required
To successfully install hardscape lighting outdoors, you'll need a few essential tools and materials at your disposal.
Having the right tools will make the process smoother and more efficient.
- Shovel: You'll need this for digging holes or trenches for the wiring and fixtures.
- Wire Strippers: These are crucial for preparing the electrical connections, ensuring a secure fit.
- Screwdriver Set: A variety of screwdrivers will help you install the fixtures and secure any brackets needed.
Gathering these tools before you start will save you time and frustration.
Make sure everything's in working order, and you'll be ready to create an inviting outdoor space with your hardscape lighting!
Materials for Installation
Gathering the right materials is crucial for a successful outdoor hardscape lighting installation. Start with the lighting fixtures themselves; choose ones that suit your style and needs.
You'll also need a transformer to convert your electrical supply, along with low-voltage wiring to connect everything. Make sure you grab wire connectors and possibly a waterproof junction box to protect your connections.
Don't forget stakes or mounts for securing your lights in place. If you're planning to install lights in concrete or stone, consider using a drill and masonry bits.
Lastly, have some outdoor-rated extension cords on hand, just in case you need to extend your power source. With the right materials, you'll be well on your way to enhancing your outdoor space!
Safety Precautions Before You Start
Before you start your hardscape lighting project, make sure you gather all the essential tools you'll need.
It's also important to check local regulations to ensure you're compliant with any codes or permits.
Taking these steps will help you avoid any potential issues down the line.
Gather Essential Tools
While you're preparing to install hardscape lighting outdoors, it's crucial to have the right tools and safety gear on hand. Ensuring your safety and efficiency will make the installation process smoother.
Here's a quick list of essential items you'll need:
- Wire Cutters: These will help you trim the electrical wire to the right length.
- Screwdriver Set: You'll need these for securing fixtures and making electrical connections.
- Safety Goggles: Protect your eyes from debris when digging or working with tools.
Having these tools ready won't only keep you safe but also make your hardscape lighting project more enjoyable.
Check Local Regulations
With your tools ready, it's important to ensure you're in compliance with local regulations regarding outdoor lighting installations.
Start by checking with your city or county building department. They often have specific guidelines on where and how to install lighting, especially regarding electrical safety and zoning laws. You might need a permit, especially for permanent installations.
Also, consider any homeowners' association rules if you live in a community with such regulations. These rules can dictate the style, brightness, and placement of your lights.
Ignoring these regulations can lead to fines or required removals, so it's best to verify all local codes before you begin. Taking these steps ensures a smooth and compliant installation process.
Step-by-Step Installation Process
Once you've gathered all your materials and chosen the perfect spots for your hardscape lighting, it's time to dive into the installation process.
Follow these simple steps to ensure a smooth setup:
- Mark the Locations: Use a chalk line or stakes to outline where each light will go. This helps visualize the layout before digging or placing fixtures.
- Dig Trenches: If you're using wired lights, dig trenches for the cables. Aim for a depth of at least 6 inches to protect the wiring from damage.
- Install Fixtures: Place your lights in the marked spots and connect the wiring according to the manufacturer's instructions. Secure everything in place to avoid movement.
Now you're ready to enjoy your beautiful outdoor lighting!
Testing and Maintaining Your Hardscape Lighting
Testing and maintaining your hardscape lighting is essential for keeping your outdoor space well-lit and inviting.
Start by regularly checking each light fixture to ensure they're functioning properly. If a light's out, replace the bulb or check for faulty wiring. Don't forget to inspect the connections and ensure they're secure and free of corrosion.
Cleaning the fixtures is just as important; dirt and debris can block light output. Use a soft cloth to wipe them down, and clear any obstructions around the lights.
Lastly, consider seasonal adjustments. As plants grow or landscape changes, you might need to reposition your lights for optimal illumination.
Frequently Asked Questions
What Type of Bulbs Should I Use for Hardscape Lighting?
For hardscape lighting, you should use LED bulbs. They're energy-efficient, long-lasting, and provide excellent illumination. Opt for warm white for a cozy ambiance, or cool white for a modern, bright look that enhances your outdoor space.
Can I Install Hardscape Lighting Myself Without Professional Help?
Yes, you can install hardscape lighting yourself without professional help. Just ensure you follow manufacturer instructions, use proper tools, and prioritize safety. It's a manageable DIY project that can enhance your outdoor space beautifully.
How Do I Choose the Right Transformer for My Lighting?
To choose the right transformer, calculate your total wattage needs by adding up your lighting fixtures' wattages. Then, select a transformer that exceeds this total to ensure optimal performance and avoid overloading.
What Is the Best Time of Year to Install Outdoor Lighting?
The best time to install outdoor lighting is during mild seasons like spring or early fall. You'll avoid extreme weather, making your project easier and ensuring the lights function optimally throughout the year.
Are There Any Local Regulations for Outdoor Lighting Installations?
You should definitely check local regulations before installing outdoor lighting. Rules can vary by area regarding brightness, placement, and energy efficiency. Contact your local building department or review municipal codes to ensure compliance.

How Do I Design Energy-Efficient Landscape Lighting?
How Do I Design Landscape Lighting for a Multi-Use Yard?

Which Fixtures Are Best for Landscape Lighting?
About Author
Rohan C.
Rohan wants to build his own dream backyard to get away from their busy home life. And he also helps bring design to life and build it for his customers using high quality products and building techniques. Rohan has provided many colorful ideas including a water fountain, gazebo, pergola, BBQ area, splash pad, sandbox, and decking with a built-in barbecue.