How Do I Create Layered Stone Designs in My Backyard?
Creating layered stone designs in your backyard can transform an ordinary space into a visually appealing oasis. Start by selecting a variety of stones that complement each other, but don't rush the process. Planning your layout thoughtfully is crucial for ensuring accessibility and harmony with your garden's existing features. Once you have a solid foundation, you can explore layering techniques that add depth and character. What's next may surprise you as you consider the perfect finishing touches.
Key Takeaways
- Select stones with varying colors, textures, and sizes to create an aesthetically pleasing and harmonious design in your backyard.
- Plan your layout by assessing available space, existing features, and sun and shade patterns for optimal placement.
- Prepare the site by clearing vegetation, removing debris, and leveling the ground to ensure a stable foundation for your stone installation.
- Utilize layering techniques by stacking larger stones as a base and filling gaps with smaller stones for depth and visual interest.
- Maintain your layered stone features by cleaning regularly, checking for damage, and sealing stones periodically to preserve their beauty and functionality.
Selecting the Right Stones for Your Design
When it comes to selecting the right stones for your design, consider three key factors: color, texture, and size.
First, think about how the colors of the stones will complement your backyard. You might want vibrant hues or subdued tones that blend seamlessly.
Next, pay attention to texture; smooth stones can give a polished look, while rough stones add a rustic feel.
Finally, size matters. Larger stones can serve as focal points, while smaller stones can create pathways or fill gaps.
Don't forget to visualize how these elements work together, ensuring they create a harmonious design that enhances your outdoor space.
Planning Your Layout
When planning your layout, start by assessing the available space in your backyard.
Think about how you want the design to flow and consider the patterns that will guide movement and aesthetics.
Finally, choose stone types that complement both your vision and the environment.
Assess Available Space
Assessing the available space in your backyard is crucial for planning a successful layered stone design. Start by measuring your yard's dimensions and noting any existing features, like trees, fences, or pathways. This helps you visualize how the stone layers will fit into the overall layout.
Consider the sun and shade patterns, as they can affect plant growth and the aesthetics of your design. Don't forget to think about accessibility; ensure you can easily reach each area for maintenance.
Sketch a rough layout to see how different stone sizes and shapes will interact with your space. By carefully evaluating your backyard, you'll create a harmonious design that enhances your outdoor living area.
Design Flow Patterns
Creating a smooth flow in your backyard design is essential for both functionality and aesthetics. To achieve this, start by planning your layout with clear pathways that guide movement. Consider how you want to connect different areas, like seating, gardens, and water features.
Here's a simple table to help you visualize the flow patterns:
| Area Type | Functionality |
|---|---|
| Pathways | Connects different spaces |
| Seating Areas | Promotes relaxation |
| Gardens | Enhances visual appeal |
Choose Stone Types
With a well-planned flow in place, it's time to select the right stone types for your backyard design.
Consider the overall theme you want to achieve—whether it's rustic, modern, or natural. For a cohesive look, mix different shapes and sizes but stick to a color palette that complements your home and landscape.
Popular options include flagstone for walkways, river stones for drainage areas, and granite for retaining walls.
Don't forget about texture; smooth stones offer a sleek finish, while rough-hewn varieties add character.
Think about durability as well—some stones are better suited for high-traffic areas.
Finally, visit local suppliers to see samples, so you can visualize how they'll work in your space.
Preparing the Site
Before you start laying down your stone designs, you need to clear any existing vegetation from the area.
Once that's done, make sure to level the ground to create a stable foundation.
This preparation sets the stage for a beautiful and lasting backyard feature.
Clear Existing Vegetation
To ensure a successful installation of layered stone designs, clearing existing vegetation is essential. You need a clean canvas to work with, which means removing any unwanted plants, grass, or debris.
Start by assessing the area and identifying what needs to go.
Here are some steps to guide you:
- Cut down tall grasses and weeds: Use a lawnmower or trimmer to reduce the height, making it easier to remove.
- Dig out roots: For stubborn plants, you'll need to dig deep to ensure roots don't regrow.
- Dispose of debris: Clear the area of all cuttings and roots to avoid any hindrance during installation.
Level the Ground
After clearing the area of vegetation, the next step is leveling the ground to create a stable foundation for your layered stone designs.
Start by marking the outline of your design with stakes and string, ensuring it's the right shape and size. Then, use a shovel to remove any high spots and fill in low areas. A rake can help you achieve an even surface.
Compact the soil with a tamper or plate compactor to prevent future settling. If you're working with larger stones, consider adding a layer of gravel for better drainage and stability.
Finally, check for levelness with a carpenter's level. Once you're satisfied with the ground's evenness, you're ready to move on to laying your stones.
Layering Techniques and Tips
While you might think layering stone designs is complex, it's actually quite straightforward with the right techniques.
Start by choosing stones of varying sizes to create depth and visual interest. You can stack larger stones as a base and fill in gaps with smaller ones.
Here are some tips to enhance your design:
- Vary the textures: Mix smooth and rough stones for contrast.
- Create pathways: Use layered stones to outline walkways or borders.
- Incorporate slopes: Position stones at different angles to add dimension.
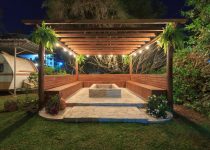
Enhancing Your Design With Plants and Accessories
Layering stones creates a strong foundation, but adding plants and accessories can truly elevate your design. Choose plants that complement the colors and textures of your stones. Low-maintenance perennials, ornamental grasses, or vibrant flowers can soften hard edges and bring life to your space.
Consider using containers or raised beds for added height and variety.
Incorporate accessories like decorative stones, sculptures, or garden lights to enhance visual interest. A well-placed bench or seating area invites relaxation and encourages enjoyment of your design.
Don't forget to consider pathways; stones can guide visitors through your garden while blending seamlessly with your layers.
Maintenance and Care for Your Layered Stone Features
To keep your layered stone features looking their best, regular maintenance is essential. Taking a few simple steps can help preserve the beauty and functionality of your design.
- Clean regularly: Use a soft brush and mild detergent to remove dirt and debris. Avoid harsh chemicals that can damage the stone.
- Check for damage: Regularly inspect for cracks or loose stones. Addressing these issues early can prevent larger problems down the line.
- Seal periodically: Depending on your stone type, you might need to apply a sealant every couple of years to protect against stains and moisture.
Frequently Asked Questions
What Tools Do I Need for Creating Layered Stone Designs?
You'll need a few essential tools for creating layered stone designs: a shovel, a level, a rubber mallet, a trowel, and landscape fabric. Having these will make your project smoother and more efficient.
How Long Does It Take to Complete a Layered Stone Project?
It typically takes a few days to weeks to complete a layered stone project, depending on the size and complexity. You'll need to plan carefully and work efficiently to achieve the desired results.
Can I Incorporate Recycled Materials in My Design?
Absolutely, you can incorporate recycled materials into your design! Using reclaimed stones, bricks, or even glass can add unique character and sustainability. Just ensure they complement your overall aesthetic for a cohesive look.
Are There Any Local Regulations for Stone Installation?
Before starting your project, check local regulations regarding stone installation. You'll want to ensure you're following guidelines for permits, zoning, and safety standards. Contact your local planning department to get the most accurate information.
How Do I Avoid Common Mistakes During Installation?
To avoid common mistakes during installation, you should plan your layout carefully, ensure proper drainage, and use quality materials. Don't rush the process, and always double-check measurements before cutting or placing stones.

Does Rattan Patio Furniture Last

What Wicker Benches Work Best in Garden Patios?
Which Decorations Work for Campsite Privacy?
About Author
Rohan C.
Rohan wants to build his own dream backyard to get away from their busy home life. And he also helps bring design to life and build it for his customers using high quality products and building techniques. Rohan has provided many colorful ideas including a water fountain, gazebo, pergola, BBQ area, splash pad, sandbox, and decking with a built-in barbecue.