How Do I Attach Chicken Breats to Rotisserie Spit Forks
Have you ever struggled with attaching chicken breasts to rotisserie spit forks? It can be a bit tricky at first, but once you get the hang of it, you'll be enjoying delicious rotisserie chicken in no time.
Let's walk through the process together, from understanding the rotisserie spit forks to securing the chicken breasts and getting them ready for the rotisserie.
You'll soon be on your way to mastering the art of rotisserie cooking, and your taste buds will thank you for it.
Understanding the Rotisserie Spit Forks
To securely attach chicken breasts to rotisserie spit forks, you'll need to understand how the forks are designed to hold the meat in place while it cooks. The spit forks typically have two prongs that secure the meat from both ends, ensuring it stays in place while rotating. Understanding the mechanics of the forks is crucial for a successful and delicious rotisserie chicken.
When spatchcocking the chicken, it's essential to position the forks so that they pierce through the thickest part of the breast to keep it steady during the cooking process. This technique not only helps the chicken cook evenly but also allows for a beautiful presentation when it's time to carve and serve.
Furthermore, selecting the right seasoning is vital for enhancing the flavor of the chicken. Whether it's a simple salt and pepper rub or a more complex blend of herbs and spices, the seasoning should complement the natural flavors of the meat and create a delicious outer crust.
Lastly, regular maintenance of the rotisserie spit, such as cleaning and greasing the mechanism, is important to ensure smooth operation. Additionally, troubleshooting techniques for common issues like uneven rotation or excessive wobbling should be familiar to maintain a hassle-free cooking experience.
Preparing the Chicken Breasts
Before you attach the chicken breasts to the rotisserie spit forks, it's important to prepare them properly.
Start by cleaning the breasts to remove any excess fat or debris.
Then, make sure to secure the forks tightly to the breasts and adjust their placement to ensure even cooking.
Cleaning the Breasts
You can start by rinsing the chicken breasts under cold water and patting them dry with paper towels. This simple step helps to remove any potential bacteria and ensures that your chicken is clean and ready for seasoning and cooking.
Here are three essential tips for cleaning the chicken breasts:
- Inspect the Breasts: Before seasoning, carefully inspect the chicken breasts for any remaining feathers, excess fat, or bone fragments. This ensures that you're serving the highest quality meat to your family and guests.
- Trim Excess Fat: Use a sharp knife to trim any excess fat from the chicken breasts. This step not only helps in cleaning the meat but also ensures that the chicken cooks evenly on the rotisserie.
- Sanitize Your Workspace: After handling raw chicken, it's crucial to sanitize your workspace, cutting board, and utensils to prevent cross-contamination and maintain a clean cooking environment.
Securing the Forks
After ensuring that the chicken breasts are clean and free of any remaining feathers or excess fat, the next step is to securely attach them to the rotisserie spit forks. Proper positioning is key to ensuring even cooking and preventing the chicken breasts from sliding or rotating unevenly.
Start by sliding the forks onto the spit and adjusting them to the approximate width of the chicken breasts. Then, carefully thread the chicken breasts onto the spit, ensuring they're centered and balanced between the forks.
Once in position, tighten the forks securely to the spit, ensuring fork stability and a snug fit to prevent any wobbling during the cooking process. Double-check the positioning to confirm that the chicken breasts are evenly secured, and the forks are stably in place before starting the rotisserie.
Adjusting the Placement
Position the chicken breasts evenly on the spit, ensuring they're centered and balanced between the forks.
To adjust the placement effectively, follow these simple steps:
- Spit placement: Slide the chicken breasts onto the spit, making sure they're positioned in the center to ensure even cooking. This will help prevent one side from being overcooked while the other is undercooked.
- Fork adjustment: Secure the forks tightly against the chicken breasts, ensuring they're firmly in place to prevent any wobbling or sliding during the cooking process.
- Balance check: Once the chicken breasts are in position, give the spit a gentle spin to check for any imbalance. Adjust the placement if needed to ensure the chicken breasts are evenly positioned and the spit rotates smoothly.
Securing the Chicken Breasts to the Forks
When securing the chicken breasts to the rotisserie spit forks, it's important to pay attention to the positioning of the forks.
Make sure the forks are securely fastened to the breasts to prevent them from moving around during the cooking process.
Tying the breasts with kitchen twine can also help keep them in place and ensure even cooking.
Fork Positioning
To secure the chicken breasts to the rotisserie spit forks, you can use butcher's twine or silicone bands to firmly attach them in place. When positioning the forks, it's crucial to ensure fork alignment and spit balance to prevent any wobbling during the rotation. Here are three essential tips to master fork positioning:
- Align the Forks: Position the forks evenly on each side of the chicken breasts to maintain balance and stability during the rotation.
- Secure with Twine or Bands: Use butcher's twine or silicone bands to tightly secure the chicken breasts to the forks, preventing any movement while cooking.
- Double-Check Stability: Before starting the rotisserie, double-check that the chicken breasts are securely fastened, ensuring smooth and consistent spit rotation.
Tying the Breasts
You can securely attach the chicken breasts to the rotisserie spit forks by tightly wrapping them with butcher's twine or silicone bands.
When using butcher's twine, start by tying one end of the twine to the end of one spit fork. Then, carefully wrap the twine around the breast in a crisscross pattern, ensuring it's secure but not too tight. Finally, tie off the twine at the other end of the spit fork.
If you prefer using silicone bands, place the breast on the spit forks and wrap the bands around the breast and forks, securing them in place.
Whichever tying technique you choose, make sure the breasts are evenly centered and securely fastened to the rotisserie attachment. This will help the breasts cook evenly and prevent them from falling off during the rotation.
Positioning the Rotisserie Spit
Position the rotisserie spit with the prongs facing up and the handle to the right, ensuring the chicken breasts are securely fastened and evenly balanced for a successful and delicious rotisserie cooking experience.
Stability: It's crucial to ensure the spit is securely positioned in the rotisserie unit to prevent any wobbling or imbalance during the cooking process.
Evenness: Position the chicken breasts in the center of the spit to achieve even cooking and to prevent any part of the meat from being too close to the heat source.
Clearance: Ensure there's enough space between the chicken breasts and any heating elements to avoid potential burning and to allow for proper air circulation.
When positioning the rotisserie spit, remember that the proper alignment not only guarantees even cooking but also ensures a juicier and more succulent result.
Adjusting the Rotisserie Settings
Consider adjusting the rotisserie settings based on the desired cooking method and the specific requirements of your chicken breasts.
First, let's talk about rotisserie heat. For direct heat rotisseries, set the heat to medium-high to ensure that the chicken breasts cook evenly and get a nice, crispy exterior. If you're using an indirect heat rotisserie, maintain a consistent temperature by adjusting the heat settings according to the manufacturer's instructions. Keep an eye on the temperature throughout the cooking process to make any necessary adjustments.
Next, let's discuss spit rotation. The speed of the spit rotation can affect how the chicken breasts cook. A slower rotation allows for more even cooking and helps to retain the juices, while a faster rotation can create a crispy, golden-brown exterior. Adjust the rotation speed based on your desired outcome and the specific rotisserie model you're using.
Monitoring the Cooking Progress
To ensure the chicken breasts are cooking properly, regularly check the internal temperature using a meat thermometer. This will help you monitor the doneness and ensure your chicken is cooked to perfection.
Here are three important tips for monitoring the cooking progress:
- Checking Doneness and Temperature: Use a meat thermometer to check the internal temperature of the chicken breasts. The USDA recommends that poultry should be cooked to an internal temperature of 165°F (74°C) to ensure it's safe to eat. Insert the thermometer into the thickest part of the breast without touching the bone for an accurate reading.
- Rotating and Basting Technique: To ensure even cooking and a beautifully browned exterior, rotate the rotisserie spit occasionally. Additionally, use a basting brush to apply flavorful marinades or juices to the chicken breasts throughout the cooking process. This will help keep the meat moist and add delicious flavor.
- Regular Monitoring: Keep an eye on the cooking progress regularly, especially as the chicken breasts approach the target temperature. This will help you prevent overcooking and ensure that your chicken turns out juicy and delicious.
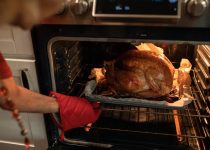
Removing and Serving the Chicken Breasts
As you finish monitoring the cooking progress and ensuring the chicken breasts are cooked to perfection, the next step is to carefully remove and serve them. Start by turning off the rotisserie and allowing the chicken to rest for about 10 minutes. This allows the juices to redistribute, ensuring a moist and flavorful result.
Then, using a pair of heat-resistant gloves or carving forks, carefully slide the chicken breasts off the spit forks and onto a cutting board.
When it comes to carving techniques, begin by slicing the chicken breasts against the grain, which helps to ensure tenderness. You can also remove the breasts from the bone and slice them into medallions for a more elegant presentation.
As for serving suggestions, consider pairing the rotisserie chicken breasts with a fresh green salad, roasted vegetables, or a side of creamy mashed potatoes. The juicy, flavorful meat will complement a wide variety of sides.
Whether you're serving a family dinner or hosting a gathering, these carving techniques and serving suggestions will help you present your rotisserie chicken breasts in an appetizing and professional manner.
Frequently Asked Questions
Can I Use Boneless, Skinless Chicken Breasts for Rotisserie Cooking?
Yes, you can use boneless, skinless chicken breasts for rotisserie cooking. Secure them onto the spit forks with care to ensure even cooking. Use kitchen twine or skewers to hold the breasts securely in place.
How Can I Prevent the Chicken Breasts From Sliding off the Forks During Cooking?
To ensure fork stability and prevent slippage, secure attachment of chicken breasts for rotisserie cooking, make sure the meat is centered and tightly threaded onto the spit forks. Properly secure the ends to prevent sliding during spit rotation.
What Are Some Seasoning or Marinade Options for Chicken Breasts on the Rotisserie?
For seasoning options, try a blend of garlic powder, paprika, and black pepper. Marinade with a mixture of lemon juice, olive oil, and herbs for a flavorful twist. Ensure even cooking by using temperature control and basting regularly.
Can I Cook Other Meats or Vegetables on the Rotisserie at the Same Time as the Chicken Breasts?
You can cook other meats and vegetables on the rotisserie at the same time as the chicken breasts. Use different cooking techniques for each type of meat, and consider seasoning choices and rotisserie maintenance to ensure delicious results.
Are There Any Special Tips for Ensuring Even Cooking of the Chicken Breasts on the Rotisserie?
For even cooking of the chicken breasts on the rotisserie, here are some tips: truss the breasts to maintain shape, secure them firmly with spit forks, and periodically check for doneness. These cooking techniques ensure delicious results.

2023’s Hottest BBQ Grills for Outdoor Enthusiasts
Quiz: Your Ideal DIY Backyard Entertainment Space