Essential Guide to Framing a Drop-In Tub for Your Bathroom Renovation
Framing a drop-in tub is essential for a successful bathroom renovation. Start by taking accurate measurements to ensure a perfect fit and avoid costly adjustments. Build a sturdy framework using pressure-treated lumber for durability. Incorporate access panels for easy plumbing maintenance and plan your drainage and venting carefully. Make sure everything is level and secure to prevent any movement. There's plenty more to consider for a seamless installation, so keep exploring the details!
Table of Contents
Key Takeaways
- Accurate measurements are crucial for ensuring a proper fit and preventing costly installation adjustments for drop-in tubs.
- Build a sturdy framework with pressure-treated lumber, reinforcing corners for stability and maintaining level alignment.
- Incorporate access panels for easy maintenance of plumbing, following standard dimensions and local building codes.
- Plan drainage and venting carefully, positioning the p-trap close to the main drain and minimizing pipe runs within walls.
- Ensure a secure installation by double-checking the tub's level and drain alignment with the plumbing before finalizing the structure.
Importance of Accurate Measurements
When you're framing a drop-in tub, accurate measurements are essential to ensure a perfect fit. Without them, you risk improper installation, leading to costly adjustments down the line.
Start by measuring the height and position of the tub, remembering to account for the rim's thickness and surrounding materials like tile or wood. Establish a center mark for the tub cutout so the drain aligns with the plumbing—misalignment can create drainage issues.
To ensure consistency, measure from multiple points, including corners and existing structures. Regularly double-check your measurements against the manufacturer's specifications to catch any errors early.
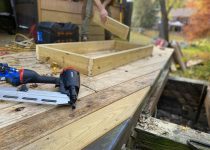
Building a Sturdy Framework
Accurate measurements lay the groundwork for a solid framework that supports your drop-in tub effectively. Start by measuring your tub's dimensions to create a precise framework that accommodates its size and weight. Use pressure-treated lumber for durability and moisture resistance. Construct the framework deep enough for proper support while allowing clearance for plumbing components.
| Component | Material | Purpose |
|---|---|---|
| Framework | Pressure-treated wood | Support tub weight |
| Blocking | Extra lumber | Reinforce corners |
| Leveling | Spirit level | Ensure proper alignment |
| Securing | Screws | Attach framework to floor/walls |
Reinforce corners with blocking for stability, and ensure everything's level and square before securing it. This'll prevent misalignment during installation.
Incorporating Access Panels for Maintenance
Incorporating access panels in the wall behind your drop-in tub is essential for easy maintenance and repairs. These panels allow you to reach plumbing and drainage systems without having to remove the tub.
Strategically placing access panels gives you direct access to critical components like the p-trap and shut-off valves, minimizing extensive demolition. When planning the size, standard dimensions range from 12×12 inches to 16×16 inches, depending on your plumbing needs.
Make sure the access panel is framed properly and finished to match the surrounding wall for a seamless look.
Lastly, always check local building codes and regulations regarding access panels to ensure compliance and avoid any potential issues during inspections.
Planning for Drainage and Venting
Proper planning for drainage and venting is crucial to ensure your drop-in tub functions efficiently.
Start by routing the drain pipe so it doesn't exceed six feet before needing to vent; this prevents clogs and maintains proper flow.
Position the p-trap wisely, as it requires a larger cutout in the floor and should be close to the main drain line to minimize distance.
If necessary, adjust the venting system from a full three-inch to a two-inch setup, making sure it meets local plumbing codes and allows for adequate airflow.
Keep structural integrity in mind by limiting pipe runs within walls to reduce leaks.
Also, plan for access points, like an access door, for easy maintenance of the drainage system under your tub.
Ensuring Level and Secure Installation
After you've planned for drainage and venting, the next step is to ensure your drop-in tub is level and securely installed.
Start by establishing a level foundation, using a level tool to check both side-to-side and front-to-back alignment. This is crucial for proper drainage and prevents sagging or cracking.
Construct a sturdy frame with 2×4 or 2×6 lumber, aligned to the tub's dimensions and leaving space for an access door if needed.
Once your tub is level, secure it to the framing with appropriate fasteners to avoid any movement during use or while installing surrounding materials.
Finally, double-check that the tub's drain aligns perfectly with your plumbing to ensure efficient drainage and prevent leaks.
Frequently Asked Questions
How Much Space Is Needed Around a Drop-In Tub?
You need a minimum of 3 to 6 inches around your drop-in tub for installation. Aim for 12 inches from walls, 18 inches in front, and 2 feet from opposing fixtures for optimal functionality and comfort.
What Goes Around a Drop-In Tub?
Around a drop-in tub, you'll typically find a deck or ledge for easy access and decorative elements. Ensure there's proper framing, plumbing fixtures, and an access panel for maintenance without compromising aesthetics or functionality.
What Is the Best Material for a Drop-In Bathtub?
When choosing the best material for your drop-in bathtub, consider acrylic for lightweight durability, cast iron for heat retention and longevity, or fiberglass for affordability. Each option has unique benefits to suit your needs.
How Do You Finish a Drop in Tub?
To finish your drop-in tub, frame it securely, install waterproof backer board, apply caulk around edges, choose a complementary countertop, and finalize with matching tiling or cabinetry. This ensures durability and aesthetic appeal.
Tools Every DIY Hot Tub Deck Builder Needs

Using Solar Power for Your Outdoor Pool

How Can a Dining Table Made From a Tree Trunk Enhance Your Home?
About Author
Rohan C.
Rohan wants to build his own dream backyard to get away from their busy home life. And he also helps bring design to life and build it for his customers using high quality products and building techniques. Rohan has provided many colorful ideas including a water fountain, gazebo, pergola, BBQ area, splash pad, sandbox, and decking with a built-in barbecue.